#componente vue
Explore tagged Tumblr posts
Visit Tumblr Blog
Explore Tumblr blogs with no restrictions, modern design and the best experience.
Last Seen Tumblr Blogs


Fun Fact
If you dial 1-866-584-6757, you can leave an audio post for your followers.
Text
À primeira vista, o chocolate pode parecer uma guloseima inofensiva para os humanos, mas pode representar sérios perigos para os cães. Embora apreciemos o seu sabor rico e a sua doçura, o chocolate para cachorro, contém substâncias tóxicas para os cães, como a teobromina e a cafeína. Estes componentes são inofensivos para nós, mas podem causar graves problemas de saúde nos animais de estimação. Compreender estes riscos é crucial para garantir a segurança e o bem-estar do seu companheiro peludo.
At first glance, chocolate may seem like a harmless treat for humans, but it can pose serious dangers for dogs. Although we appreciate its rich taste and sweetness, chocolate for dogs contains substances that are toxic to dogs, such as theobromine and caffeine. These components are harmless to us, but can cause serious health problems in pets. Understanding these risks is crucial to ensuring the safety and well-being of your furry companion.
À première vue, le chocolat peut sembler être une friandise inoffensive pour les humains, mais il peut présenter de graves dangers pour les chiens. Bien que nous apprécions son goût riche et sa douceur, le chocolat pour chiens contient des substances toxiques pour les chiens, telles que la théobromine et la caféine. Ces composants sont inoffensifs pour nous, mais peuvent provoquer de graves problèmes de santé chez les animaux de compagnie. Il est essentiel de comprendre ces risques pour garantir la sécurité et le bien-être de votre compagnon à poils.
A primera vista, el chocolate puede parecer una golosina inofensiva para los humanos, pero puede entrañar graves peligros para los perros. Aunque apreciamos su rico sabor y dulzor, el chocolate para perros contiene sustancias tóxicas para ellos, como la teobromina y la cafeína. Estos componentes son inofensivos para nosotros, pero pueden causar graves problemas de salud en las mascotas. Conocer estos riesgos es crucial para garantizar la seguridad y el bienestar de su peludo compañero.
#animals#cats#dogs#fishblr#horse#wildanimals#wildlife#equine#marineanimals#curiosities#Tiere#Katzen#Hunde#Fischblr#Pferd#Wildtiere#Wildlife#Equine#Meerestiere#Kuriositäten#animaux#chats#chiens#cheval#animaux sauvages#équine#animaux marins#curiosités#животные#кошки
1 note
·
View note
Text
TypeScript / Vue - props computados, condicionales y bucles
Hoy veremos tres elementos para nuestros componentes de Vue. Espero les sea de utilidad y buen finde!
Bienvenidos sean a este post, hoy veremos tres temas interesantes. En el dia de hoy veremos tres temas que se manejan en cualquier codigo. El primero sera para establecer propiedades denominadas como computados, los cuales son valores de solo lectura pero que nos permiten manejar cierta logica. Los condicionales tambien lo podemos aplicar a las propiedades y asi como tambien un bucle, como en…
0 notes
Text
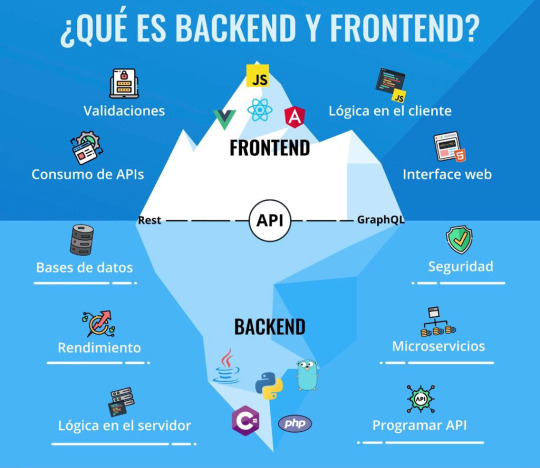
estrutura de um BLOG
Para criar um site com serviço (frequentemente referido como um site web com backend) moderno e escalável, você precisa considerar a estrutura em várias camadas, incluindo frontend, backend, banco de dados, e infraestrutura. Aqui está uma visão geral da arquitetura típica de um site com serviço:
1. Frontend (Cliente)
O frontend é a parte visível do site com a qual os usuários interagem diretamente. Pode ser desenvolvido usando várias tecnologias:
HTML: Linguagem de marcação para estruturar o conteúdo da web.
CSS: Folhas de estilo para estilizar o conteúdo HTML.
JavaScript: Linguagem de programação para adicionar interatividade e dinamismo ao site.
Frameworks e Bibliotecas: React, Angular, Vue.js para desenvolver interfaces de usuário dinâmicas e responsivas.
2. Backend (Servidor)
O backend é a parte do site que processa a lógica do servidor, gerencia dados e responde às solicitações dos clientes. Ele pode ser desenvolvido usando várias linguagens e frameworks:
Linguagens de Programação: Python, JavaScript (Node.js), Java, Ruby, PHP, etc.
Frameworks: Django (Python), Flask (Python), Express (Node.js), Spring (Java), Ruby on Rails (Ruby), Laravel (PHP), etc.
APIs: A criação de APIs (RESTful ou GraphQL) para comunicação entre o frontend e o backend.
3. Banco de Dados
O banco de dados armazena os dados do site. A escolha do banco de dados depende dos requisitos do projeto:
Relacionais (SQL): MySQL, PostgreSQL, Oracle Database, Microsoft SQL Server.
Não Relacionais (NoSQL): MongoDB, Redis, DynamoDB, Cassandra.
4. Infraestrutura
A infraestrutura refere-se ao ambiente onde o site é hospedado e como ele é gerenciado e escalado:
Servidores e Hospedagem: AWS, Google Cloud, Azure, DigitalOcean, Heroku, etc.
Containers e Orquestração: Docker para containerização e Kubernetes para orquestração de containers.
CI/CD (Integração Contínua/Entrega Contínua): Jenkins, Travis CI, CircleCI, GitHub Actions para automatizar o pipeline de desenvolvimento e implantação.
5. Segurança
A segurança é crítica em todas as camadas da arquitetura do site:
Autenticação e Autorização: OAuth, JWT, Passport.js.
Certificados SSL/TLS: Para criptografar a comunicação entre o cliente e o servidor.
Proteção contra Ataques: Proteção contra SQL injection, XSS, CSRF, etc.
6. Serviços e Funcionalidades Adicionais
Para adicionar funcionalidades e melhorar a experiência do usuário, você pode integrar vários serviços adicionais:
Serviços de Cache: Redis, Memcached para melhorar o desempenho do site.
Serviços de Mensageria: RabbitMQ, Apache Kafka para comunicação assíncrona.
CDN (Content Delivery Network): Cloudflare, Akamai para distribuir conteúdo e melhorar a velocidade de carregamento.
Exemplo de Estrutura de Projeto
Aqui está um exemplo simplificado de como os arquivos e diretórios podem ser organizados em um projeto típico
├── frontend/
│ ├── public/
│ │ └── index.html
│ ├── src/
│ │ ├── components/
│ │ ├── pages/
│ │ ├── App.js
│ │ └── index.js
│ ├── package.json
│ └── webpack.config.js
├── backend/
│ ├── src/
│ │ ├── controllers/
│ │ ├── models/
│ │ ├── routes/
│ │ ├── services/
│ │ └── app.js
│ ├── .env
│ ├── package.json
│ └── server.js
├── database/
│ └── schema.sql
├── docker-compose.yml
├── Dockerfile
├── README.md
└── .gitignore
Descrição dos Diretórios e Arquivos
frontend/: Contém todo o código do frontend.
public/: Arquivos públicos como index.html.
src/: Código fonte do frontend (componentes React/Vue/Angular).
backend/: Contém todo o código do backend.
controllers/: Lida com a lógica das requisições.
models/: Definições dos modelos de dados.
routes/: Definições das rotas da API.
services/: Serviços de negócios e integração com APIs externas.
app.js: Arquivo principal da aplicação.
database/: Scripts de banco de dados.
schema.sql: Definição do esquema do banco de dados.
docker-compose.yml: Arquivo de configuração do Docker Compose para orquestrar serviços.
Dockerfile: Instruções para construir a imagem Docker do projeto.
README.md: Documentação do projeto.
.gitignore: Arquivo para especificar quais arquivos/diretórios devem ser ignorados pelo Git.
Essa estrutura e essas tecnologias podem variar dependendo das necessidades específicas do seu projeto, mas fornecem uma boa base para construir um site com serviço moderno e escalável.
0 notes
Text
Cómo crear una aplicación de mensajería con Laravel y Vue
En este tutorial voy a explicar cómo crear una aplicación de mensajería con Laravel y Vue. El objetivo del tutorial consiste en comprender y aprender a utilizar componentes de Vue en el contexto de Laravel. Por este motivo, no usaremos Inertia, aunque a priori pueda parecer la opción más sencilla. Introducción Para seguir tutorial debes tener tanto PHP como composer instalado en tu sistema, así…

View On WordPress
0 notes
Photo

5 – Componente VUEjs con Bootstrap 4 en Laravel | Rimorsoft Online Suscríbete | @rimorsoft Aprendamos en este video cómo crear un componente propio usando vuejs, laravel y bootstrap. Verás lo fácil que ... source
#bootstrap#componente#componente vue#con#framework#italomoralesf#Laravel#laravel y vuejs en español#online#php#rimorsoft#vue#vue en español#vuejs#vuejs laravel componente
1 note
·
View note
Text
Apps, webs y aplicaciones web
A medio camino entre la páginas web y las ya famosísimas Apps, o aplicaciones, nos encontramos las aplicaciones web. Es posible que muchos aún estemos intentando descifrar qué diferencia a las primeras de las segundas, como para entender qué son las terceras. Mi padre, por ejemplo, llama a todo ‘Facebook’, sin importar si realmente está usando o no esa red social. Cualquier cosa que esté en internet es eso para él. De modo que si no diferencias una web de una aplicación web tampoco debes agobiarte.
Las Apps nos han facilitado mucho la vida, eso es indudable, por lo que dar el paso hacia el diseño de aplicaciones web a medida era un paso natural que se tenía que dar. En ellas se combinan lo mejor de ambos mundos. Pero para tener clara la diferencia entre una web normal y una aplicación web, me puse en contacto con un estudio de diseño web en León, ellos están especializados en el diseño de aplicaciones web de gestión, y me hicieron una pequeña explicación que os traslado.
Diferencias entre páginas web y aplicaciones web
1. En qué se diferencian las aplicaciones web de los sitios web
Un sitio web es principalmente algo informativo y estático: la tarjeta de presentación de una empresa, un sitio de recetas, un portal de la ciudad o un wiki. Un conjunto de archivos HTML preparados previamente que se encuentran en un servidor remoto y se entregan al navegador a pedido.
Los sitios contienen varias estadísticas que, como un archivo HTML, no se generan sobre la marcha. La mayoría de las veces se trata de imágenes, archivos CSS, scripts JS, pero puede haber otros archivos: mp3, mov, csv, pdf.
Blogs, tarjetas de visita con formulario de contacto, páginas de destino con un montón de efectos… forman parte de los sitios web, aunque rompan un poco con su estatismo y simplicidad. A diferencia de los sitios completamente estáticos, ya incluyen algún tipo de lógica empresarial.
Y una aplicación web es algo técnicamente más complejo. Aquí las páginas HTML se generan sobre la marcha según la solicitud del usuario. Clientes de correo electrónico, redes sociales, motores de búsqueda, tiendas en línea, programas de negocios en línea, todas estas son aplicaciones web.

2. ¿Qué son las aplicaciones web?
Las aplicaciones web se pueden dividir en varios tipos, dependiendo de las diferentes combinaciones de sus componentes principales:
El backend (backend o parte del servidor de la aplicación) se ejecuta en una computadora remota, que puede ubicarse en cualquier lugar. Se puede escribir en diferentes lenguajes de programación: PHP, Python, Ruby, C # y otros. Si crea una aplicación utilizando solo el lado del servidor, como resultado de cualquier transición entre secciones, envío de formularios, actualización de datos, el servidor generará un nuevo archivo HTML y se volverá a cargar la página en el navegador.
El frontend (frontend o parte del cliente de la aplicación) se ejecuta en el navegador del usuario. Esta parte está escrita en el lenguaje de programación Javascript. La aplicación solo puede constar de la parte del cliente, si no es necesario almacenar los datos del usuario durante más de una sesión. Estos pueden ser, por ejemplo, editores de fotografías o simples juguetes.
Aplicación de página única (SPA o aplicación de página única). Una opción más interesante cuando se utilizan tanto el backend como el frontend. Usando su interacción, puede crear una aplicación que funcionará sin necesidad de recargar la página en el navegador. O en una versión simplificada, cuando las transiciones entre secciones provocan recargas, pero se prescinde de cualquier acción en la sección.
3. Django python framework, también conocido como backend
En desarrollo, un marco es un conjunto de bibliotecas y herramientas listas para usar que lo ayudan a crear aplicaciones web. Como ejemplo, describiré el principio de funcionamiento del framework Django escrito en el lenguaje de programación Python.
En la primera etapa, la solicitud del usuario va al enrutador (despachador de URL), que decide a qué función llamar para procesar la solicitud. La decisión se toma sobre la base de una lista de reglas que consta de una expresión regular y un nombre de función: si tal o cual url, entonces esta es la función.
La función que llama el enrutador se llama vista. Cualquier lógica empresarial puede estar contenida dentro, pero la mayoría de las veces es una de dos cosas: o los datos se toman de la base de datos, se preparan y se devuelven al frente; o una solicitud vino con datos de algún formulario, estos datos se verifican y se guardan en la base de datos.
Los datos de la aplicación se almacenan en una base de datos (DB). Las bases de datos relacionales más utilizadas. Esto es cuando hay tablas con columnas predefinidas y estas tablas están vinculadas a través de una de las columnas.
Los datos de la base de datos se pueden crear, leer, modificar y eliminar. A veces puede ver la abreviatura CRUD (Create Read Update Delete) para denotar estas acciones. Se utiliza un lenguaje especial SQL (lenguaje de consulta estructurado) para consultar datos en la base de datos.
En Django, los modelos se utilizan para trabajar con la base de datos. Te permiten describir tablas y realizar consultas en el desarrollador de Python habitual, lo cual es mucho más conveniente. Esta conveniencia tiene un precio: consultas como esta son más lentas y limitadas en comparación con SQL puro.
Los datos recibidos de la base de datos se preparan a la vista para enviarlos al frente. Se pueden sustituir en la plantilla y enviar como un archivo HTML. Pero en el caso de una aplicación de una sola página, esto ocurre solo una vez, cuando se genera una página HTML, a la que están conectados todos los scripts JS. De lo contrario, los datos se serializan y se envían en formato JSON.
4. Marcos de Javascript, también conocidos como frontend
El lado del cliente de la aplicación consta de scripts escritos en el lenguaje de programación Javascript (JS) y ejecutados en el navegador del usuario. Anteriormente, toda la lógica del lado del cliente se basaba en el uso de la biblioteca jQuery, que le permite trabajar con el DOM, animaciones en la página y realizar solicitudes AJAX.
DOM (modelo de objeto de documento) es la estructura de una página HTML. Trabajar con DOM se trata de encontrar, agregar, modificar, mover y eliminar etiquetas HTML.
AJAX (javascript asíncrono y XML) es el nombre general de las tecnologías que le permiten realizar solicitudes asíncronas (sin recargar la página) al servidor e intercambiar datos. Dado que las partes cliente y servidor de la aplicación web están escritas en diferentes lenguajes de programación, para intercambiar información es necesario convertir las estructuras de datos (por ejemplo, listas y diccionarios) en las que se almacena en formato JSON.
JSON (JavaScript Object Notation) es un formato universal para intercambiar datos entre un cliente y un servidor. Es una cadena simple que se puede utilizar en cualquier lenguaje de programación.
La serialización es la conversión de una lista o diccionario a una cadena JSON. Por ejemplo:
Diccionario:
{
'id': 1,
'email': '[email protected]'
}
Cadena serializada:
'{"id": 1, "email": "[email protected]"}'
La deserialización es la conversión inversa de una cadena a una lista o diccionario.
Con la manipulación DOM, puede controlar completamente el contenido de sus páginas. Con AJAX, puede intercambiar datos entre cliente y servidor. Con estas tecnologías, ya puede crear un SPA. Pero cuando se crea una aplicación compleja, el código frontend basado en jQuery se vuelve rápidamente confuso y difícil de mantener.
Afortunadamente, JQuery ha sido reemplazado por marcos de Javascript: Backbone Marionette, Angular, React, Vue y otros. Tienen una filosofía y sintaxis diferente, pero todas te permiten administrar datos en el frontend con mucha más comodidad, tienen motores de plantilla y herramientas para crear navegación entre páginas.
Una plantilla HTML es una página HTML inteligente que utiliza variables en lugar de valores específicos y proporciona varios operadores: if , for loop y otros. El proceso de obtener una página HTML a partir de una plantilla, cuando se sustituyen las variables y se aplican operadores, se denomina renderización de plantillas.
La página renderizada resultante se muestra al usuario. Pasar a otra sección en SPA es una aplicación de un patrón diferente. Si es necesario utilizar otros datos en la plantilla, se solicitan al servidor. Todos los envíos de formularios con datos son solicitudes AJAX al servidor.
5. Cómo se comunican el cliente y el servidor entre sí
El cliente se comunica con el servidor a través del protocolo HTTP. La base de este protocolo es una solicitud de un cliente a un servidor y una respuesta del servidor a un cliente.
Para las solicitudes, suelen utilizar los métodos GET si queremos recibir datos, y POST si queremos cambiar los datos. La solicitud también contiene el host (dominio del sitio), el cuerpo de la solicitud (si es una solicitud POST) y mucha información técnica adicional.
Las aplicaciones web modernas usan HTTPS, una versión extendida de HTTP compatible con el cifrado SSL / TLS. El uso de un canal de transmisión de datos cifrados, independientemente de la importancia de estos datos, se ha convertido en una buena práctica en Internet.
Hay una solicitud más que viene antes de HTTP. Esta es una solicitud de DNS (sistema de nombres de dominio). Es necesario obtener la dirección IP a la que está vinculado el dominio solicitado. Esta información se guarda en el navegador y ya no perdemos tiempo en ella.
Cuando una solicitud del navegador llega al servidor, no llega inmediatamente a Django. Primero, es procesado por el servidor web Nginx. Si se solicita un archivo estático (por ejemplo, una imagen), Nginx lo envía de vuelta al cliente. Si la solicitud no es estática, Nginx debe enviarla por proxy (transmitirla) a Django.
Desafortunadamente, no sabe cómo. Por lo tanto, se utiliza otro programa de capa: el servidor de aplicaciones. Por ejemplo, para aplicaciones de Python, esto podría ser uWSGI o Gunicorn. Y ahora envían la solicitud a Django.
Una vez que Django ha procesado la solicitud, devuelve una respuesta con una página HTML o datos y un código de respuesta. Si todo está bien, entonces el código de respuesta es 200; si no se encuentra la página, entonces - 404; si ocurrió un error y el servidor no pudo procesar la solicitud, entonces - 500. Estos son los códigos más comunes.
6. Almacenamiento en caché en aplicaciones web
Otra tecnología que encontramos constantemente, que está presente tanto en aplicaciones web y software, como a nivel de procesador en nuestras computadoras y teléfonos inteligentes.
La caché es un concepto en desarrollo cuando los datos de uso frecuente, en lugar de recuperarse de la base de datos cada vez, calcularse o prepararse de una manera diferente, se almacenan en un lugar de fácil acceso.
Todos los navegadores tienen habilitado el almacenamiento en caché de archivos estáticos de forma predeterminada. Gracias a esto, al abrir el sitio no por primera vez, todo se carga notablemente más rápido. La desventaja para el desarrollador es que con la caché habilitada, los cambios realizados en el código no siempre son visibles de inmediato.
1 note
·
View note
Photo

React Native End-to-end Testing and Automation with Detox
Detox is an end-to-end testing and automation framework that runs on a device or a simulator, just like an actual end user.
Software development demands fast responses to user and/or market needs. This fast development cycle can result (sooner or later) in parts of a project being broken, especially when the project grows so large. Developers get overwhelmed with all the technical complexities of the project, and even the business people start to find it hard to keep track of all scenarios the product caters for.
In this scenario, there’s a need for software to keep on top of the project and allow us to deploy with confidence. But why end-to-end testing? Aren’t unit testing and integration testing enough? And why bother with the complexity that comes with end-to-end testing?
First of all, the complexity issue has been tackled by most of the end-to-end frameworks, to the extent that some tools (whether free, paid or limited) allow us to record the test as a user, then replay it and generate the necessary code. Of course, that doesn’t cover the full range of scenarios that you’d be able to address programmatically, but it’s still a very handy feature.
Want to learn React Native from the ground up? This article is an extract from our Premium library. Get an entire collection of React Native books covering fundamentals, projects, tips and tools & more with SitePoint Premium. Join now for just $9/month.
End-to-end Integration and Unit Testing
End-to-end testing versus integration testing versus unit testing: I always find the word “versus” drives people to take camps — as if it’s a war between good and evil. That drives us to take camps instead of learning from each other and understanding the why instead of the how. The examples are countless: Angular versus React, React versus Angular versus Vue, and even more, React versus Angular versus Vue versus Svelte. Each camp trash talks the other.
jQuery made me a better developer by taking advantage of the facade pattern $('') to tame the wild DOM beast and keep my mind on the task at hand. Angular made me a better developer by taking advantage of componentizing the reusable parts into directives that can be composed (v1). React made me a better developer by taking advantage of functional programming, immutability, identity reference comparison, and the level of composability that I don’t find in other frameworks. Vue made me a better developer by taking advantage of reactive programming and the push model. I could go on and on, but I’m just trying to demonstrate the point that we need to concentrate more on the why: why this tool was created in the first place, what problems it solves, and whether there are other ways of solving the same problems.
As You Go Up, You Gain More Confidence
As you go more on the spectrum of simulating the user journey, you have to do more work to simulate the user interaction with the product. But on the other hand, you get the most confidence because you’re testing the real product that the user interacts with. So, you catch all the issues—whether it’s a styling issue that could cause a whole section or a whole interaction process to be invisible or non interactive, a content issue, a UI issue, an API issue, a server issue, or a database issue. You get all of this covered, which gives you the most confidence.
Why Detox?
We discussed the benefit of end-to-end testing to begin with and its value in providing the most confidence when deploying new features or fixing issues. But why Detox in particular? At the time of writing, it’s the most popular library for end-to-end testing in React Native and the one that has the most active community. On top of that, it’s the one React Native recommends in its documentation.
The Detox testing philosophy is “gray-box testing”. Gray-box testing is testing where the framework knows about the internals of the product it’s testing.In other words, it knows it’s in React Native and knows how to start up the application as a child of the Detox process and how to reload it if needed after each test. So each test result is independent of the others.
Prerequisites
macOS High Sierra 10.13 or above
Xcode 10.1 or above
Homebrew:
/usr/bin/ruby -e "$(curl -fsSL https://raw.githubusercontent.com/Homebrew/install/master/install)"
Node 8.3.0 or above:
brew update && brew install node
Apple Simulator Utilities: brew tap wix/brew and brew install applesimutils
Detox CLI 10.0.7 or above:
npm install -g detox-cli
See the Result in Action
First, let’s clone a very interesting open-source React Native project for the sake of learning, then add Detox to it:
git clone https://github.com/ahmedam55/movie-swiper-detox-testing.git cd movie-swiper-detox-testing npm install react-native run-ios
Create an account on The Movie DB website to be able to test all the application scenarios. Then add your username and password in .env file with usernamePlaceholder and passwordPlaceholder respectively:
isTesting=true username=usernamePlaceholder password=passwordPlaceholder
After that, you can now run the tests:
detox test
Note that I had to fork this repo from the original one as there were a lot of breaking changes between detox-cli, detox, and the project libraries. Use the following steps as a basis for what to do:
Migrate it completely to latest React Native project.
Update all the libraries to fix issues faced by Detox when testing.
Toggle animations and infinite timers if the environment is testing.
Add the test suite package.
Setup for New Projects
Add Detox to Our Dependencies
Go to your project’s root directory and add Detox:
npm install detox --save-dev
Configure Detox
Open the package.json file and add the following right after the project name config. Be sure to replace movieSwiper in the iOS config with the name of your app. Here we’re telling Detox where to find the binary app and the command to build it. (This is optional. We can always execute react-native run-ios instead.) Also choose which type of simulator: ios.simulator, ios.none, android.emulator, or android.attached. And choose which device to test on:
{ "name": "movie-swiper-detox-testing", // add these: "detox": { "configurations": { "ios.sim.debug": { "binaryPath": "ios/build/movieSwiper/Build/Products/Debug-iphonesimulator/movieSwiper.app", "build": "xcodebuild -project ios/movieSwiper.xcodeproj -scheme movieSwiper -configuration Debug -sdk iphonesimulator -derivedDataPath ios/build", "type": "ios.simulator", "name": "iPhone 7 Plus" } } } }
Here’s a breakdown of what the config above does:
Execute react-native run-ios to create the binary app.
Search for the binary app at the root of the project: find . -name "*.app".
Put the result in the build directory.
Before firing up the test suite, make sure the device name you specified is available (for example, iPhone 7). You can do that from the terminal by executing the following:
xcrun simctl list
Here’s what it looks like:
Now that weve added Detox to our project and told it which simulator to start the application with, we need a test runner to manage the assertions and the reporting—whether it’s on the terminal or otherwise.
Detox supports both Jest and Mocha. We’ll go with Jest, as it has bigger community and bigger feature set. In addition to that, it supports parallel test execution, which could be handy to speed up the end-to-end tests as they grow in number.
Adding Jest to Dev Dependencies
Execute the following to install Jest:
npm install jest jest-cli --save-dev
The post React Native End-to-end Testing and Automation with Detox appeared first on SitePoint.
by Ahmed Mahmoud via SitePoint https://ift.tt/2JTJWxK
1 note
·
View note
Text
How Reactjs Made Difference From Other Front-End Frameworks?
Frameworks today plays a very important role in application development, as the standard of web apps are rising continuously, so does the complexity of UI in applications. Rich and interactive UI is in demand and only a sensible approach help in selecting the right framework for application development to meet the required demand, mission and vision. Every web application has a front-end (client-side) and a back-end (server-side). Angular, React, Vue, Ember and Backbone are today's popular front-end frameworks where react or reactjs or react.js has made a distinct place for itself. This powerful javascript library enables developers to leverage the advantage of server-side rendering. It addresses 'V' in MVC while rendering a flexible, performance-oriented and componentized solutions. React is best to use when an app needs to handle a long list of dynamic content change within the view or require quick page loads. What Revolution React Made React js development services meets the growing needs of dynamic front-ends includes interactive content and sleek desktop-like user experiences due to the attributes framework known for. Facebook brought react back in 2013, and since then the framework is addressing all shifts front-end is experiencing. From slow loading screens to blank white pages and other lags in performance while waiting for the browsers to download the javascript essential to render a page, react introduced a workaround for it. How React Simplifies Addressing To SSR? The beauty of SSR is that it let the app to pre-render the initial state of a view before it appears on the browser to be viewed by the user. When a user loads a web page, he/she gets to see the page that designer and developers intended, without having to wait for their browser to download the JavaScript necessary to render the page. Going with SSR is also great for search engine optimization results. The Virtual DOM The Virtual DOM keep tune with two copies of the DOM, i.e., original and an updated version that reflects changes received from the view. With the help of Virtual DOM, react easily create notes of the differences and outputs the DOM operations necessary only to update the parts of the UI that changed. Through this process, react also overcomes the shortcoming of SSR that require to re-develop the entire updated view. React Native Whether you agree or not, going with react has a significant advantage for your digital business when it needs to be robust on mobile platforms too. Unlike other Javascript mobile frameworks such as Ionic or Cordova, reactjs development company can write UI components in javascript that compile to native code for iOS and Android. That means an app written in javascript would perform like an app written in native languages like Java (Android) and Swift or Objective-C (iOS). If You Have Questions like "Why Would I Use React in My Project?", then read below." React is backed by robust UI library that also holds the power of SSR, component-based web development, isomorphic Javascript as well as new dynamic web apps. The framework shines in situations such as dynamic, data-heavy, content within a single view a la Facebook or Instagram. You can determine using React if... If hired read developers are in love with Om Project and a fan of ClojureScript If V is significant to you in the MVC of your app If unidirectional data flow do not bother your team of developers If you want to be future ready since react has become a significant front-end web development framework The javascript focused framework emphasis on component-based web development that means it is well encapsulated and works excellent with another tech stack.
4 notes
·
View notes
Text
Lenguajes de la Web
Backend
El backend, también conocido como la parte del servidor en desarrollo web, es el área que se encarga de la lógica de negocio, las operaciones de base de datos, la validación de datos y el rendimiento del servidor. Este es un componente crucial de cualquier aplicación web ya que, sin él, la funcionalidad completa de la aplicación no puede ser realizada. Los lenguajes de programación backend populares incluyen Python, PHP, Java y Ruby, entre otros.
Frontend
El frontend, también conocido como la parte del cliente en el desarrollo web, es la interfaz que los usuarios ven y con la que interactúan. Se encarga de la presentación de la información, la interacción del usuario y la experiencia del usuario. Los lenguajes de programación frontend más comunes son JavaScript, HTML y CSS.
JavaScript es el lenguaje principal para la creación de interacciones dinámicas en el frontend. Los frameworks como Angular, Vue y React.js han hecho que el desarrollo con JavaScript sea más eficiente y escalable.
Por ejemplo, Angular, desarrollado por Google, permite a los desarrolladores crear aplicaciones web dinámicas y de una sola página (SPA). Vue, por otro lado, es conocido por su simplicidad y facilidad de uso, lo que lo convierte en una excelente opción para aquellos que están empezando en el desarrollo frontend.

0 notes
Text
5 Mejores cursos de Vue (framework Javascript) en Coursera
5 Mejores cursos de Vue (framework Javascript) en Coursera #cursos #vue #javascript
1. Escribe una aplicación web de índice universitario con VueJS de Coursera Project Network 2. Crea una aplicación web con Vue.js de Coursera Project Network 3. Crear una vista previa de enlace web con componentes VueJS de Coursera Project Network 4. Empezando a trabajar con VueJS de Coursera Project Network 5. JavaScript moderno: Conceptos básicos de ES6 de Coursera Project Network
View On WordPress
0 notes
Text
[100% OFF] Fundamentos de VueJS 3
[100% OFF] Fundamentos de VueJS 3
What you Will learn ? Fundamentos de Vue Conceptos importantes como reactividad, modularidad, directivas, plantillas, componentes, etc. Aspectos y elementos generales que conforman el framework de VueJS Instalación y creación de pequeños ejercicios con VueJS Course Description VueJS ha ganado mucho terreno entre los frameworks Front-End tanto en la comunidad internacional como de habla hispana.…

View On WordPress
0 notes
Text
Sitios web y ejemplos de uso de Material Design para inspirarse
Sitios web y ejemplos de uso de Material Design para inspirarse
Recientemente comencé un proyecto utilizando Vuetify, marco Vue de componentes de material, y sin embargo completo y bien estructurado los componentes tienen una cierta dificultad para componer y combinar la interfaz. Si usted, como yo, no tiene el tacto para diseñar, vea esta lista de sitios y proyectos para ayudar con las inspiraciones:
Hecho con material

Hecho con material es un tumb…
View On WordPress
0 notes
Text
TypeScript / Vue - Eventos en componentes
Hoy nos centraremos en como manejar los eventos en un componente VUE. Espero les sea de utilidad!
Bienvenidos sean a este post, hoy hablaremos sobre los eventos en los componentes. En el post anterior vimos como manejar el estado de un componente para poder intercambiar informacion entre componentes. Pero tambien vimos muy por arriba como interceptar un evento y asociarlo a una funcion. Hoy nos centraremos mas en este tema, para ello utilizaremos el proyecto que creamos en el post anterior,…
0 notes
Photo

Hoje o projeto fluiu mas não conseguimos terminar uma funcionalidade. Temos pronto um componente Spinner, o Firebase configurado. Paramos na configuração de "vue routers", uma dependência que iremos configurar para tratar as rotas da nossa aplicação SPA. (em Juiz de Fora) https://www.instagram.com/p/B-drZyRBmEp/?igshid=1bchbkrowq6wq
0 notes
Text
Cómo crear Componentes Web con Vue.js
Cómo crear Componentes Web con Vue.js
💻 Tutorial en el blog: https://carlosazaustre.es/desarrollo-basado-en-componentes-con-vue-js Las arquitecturas web orientadas a Componentes es la forma actual de desarrollar en la web. Vue.js también incorpora éste método en su API para crear Componentes web, encapsulados y reutilizables. Si te ha gustado el video, no olvides darle LIKE, compartir y suscribirte 🙂 #Vue #JavaScript #CursoVue Puedes…

View On WordPress
#carlos azaustre#Cómo#como crear un component en Vue#Componentes#componentes con vue.js#componentes web#con#Crear#Desarrollo Web#javascript#programación#que es un componente web#que es un web component#screencast#tutorial#vue#vue js#vue2#vuejs#web#web components
0 notes
Text
Using Composer With WordPress
Using Composer With WordPress
Leonardo Losoviz
2019-03-04T14:00:33+01:002019-03-04T14:23:04+00:00
WordPress is getting modernized. The recent inclusion of JavaScript-based Gutenberg as part of the core has added modern capabilities for building sites on the frontend, and the upcoming bump of PHP’s minimum version, from the current 5.2.4 to 5.6 in April 2019 and 7.0 in December 2019, will make available a myriad of new features to build powerful sites.
In my previous article on Smashing in which I identified the PHP features newly available to WordPress, I argued that the time is ripe to make components the basic unit for building functionalities in WordPress. On one side, Gutenberg already makes the block (which is a high-level component) the basic unit to build the webpage on the frontend; on the other side, by bumping up the required minimum version of PHP, the WordPress backend has access to the whole collection of PHP’s Object-Oriented Programming features (such as classes and objects, interfaces, traits and namespaces), which are all part of the toolset to think/code in components.
So, why components? What’s so great about them? A “component” is not an implementation (such as a React component), but instead, it’s a concept: It represents the act of encapsulating properties inside objects, and grouping objects together into a package which solves a specific problem. Components can be implemented for both the frontend (like those coded through JavaScript libraries such as React or Vue, or CSS component libraries such as Bootstrap) and the backend.
We can use already-created components and customize them for our projects, so we will boost our productivity by not having to reinvent the wheel each single time, and because of their focus on solving a specific issue and being naturally decoupled from the application, they can be tested and bug-fixed very easily, thus making the application more maintainable in the long term.
The concept of components can be employed for different uses, so we need to make sure we are talking about the same use case. In a previous article, I described how to componentize a website; the goal was to transform the webpage into a series of components, wrapping each other from a single topmost component all the way down to the most basic components (to render the layout). In that case, the use case for the component is for rendering — similar to a React component but coded in the backend. In this article, though, the use case for components is importing and managing functionality into the application.
Getting workflow just right ain’t an easy task. So are proper estimates. Or alignment among different departments. That’s why we’ve set up “this-is-how-I-work”-sessions — with smart cookies sharing what works well for them. A part of the Smashing Membership, of course.
Explore Smashing Membership ↬
Introduction To Composer And Packagist
To import and manage own and third-party components into our PHP projects, we can rely on the PHP-dependency manager Composer which by default retrieves packages from the PHP package repository Packagist (where a package is essentially a directory containing PHP code). With their ease of use and exceptional features, Composer + Packagist have become key tools for establishing the foundations of PHP-based applications.
Composer allows to declare the libraries the project depends on and it will manage (install/update) them. It works recursively: libraries depended-upon by dependencies will be imported to the project and managed too. Composer has a mechanism to resolve conflicts: If two different libraries depend on a different version of a same library, Composer will try to find a version that is compatible with both requirements, or raise an error if not possible.
To use Composer, the project simply needs a composer.json file in its root folder. This file defines the dependencies of the project (each for a specific version constraint based on semantic versioning) and may contain other metadata as well. For instance, the following composer.json file makes a project require nesbot/carbon, a library providing an extension for DateTime, for the latest patch of its version 2.12:
{ "require": { "nesbot/carbon": "2.12.*" } }
We can edit this file manually, or it can be created/updated through commands. For the case above, we simply open a terminal window, head to the project’s root directory, and type:
composer require "nesbot/carbon"
This command will search for the required library in Packagist (which is found here) and add its latest version as a dependency on the existing composer.json file. (If this file doesn’t yet exist, it will first create it.) Then, we can import the dependencies into the project, which are by default added under the vendor/ folder, by simply executing:
composer install
Whenever a dependency is updated, for instance nesbot/carbon released version 2.12.1 and the currently installed one is 2.12.0, then Composer will take care of importing the corresponding library by executing:
composer update
If we are using Git, we only have to specify the vendor/ folder on the .gitignore file to not commit the project dependencies under version control, making it a breeze to keep our project’s code thoroughly decoupled from external libraries.
Composer offers plenty of additional features, which are properly described in the documentation. However, already in its most basic use, Composer gives developers unlimited power for managing the project’s dependencies.
Introduction To WPackagist
Similar to Packagist, WPackagist is a PHP package repository. However, it comes with one particularity: It contains all the themes and plugins hosted on the WordPress plugin and theme directories, making them available to be managed through Composer.
To use WPackagist, our composer.json file must include the following information:
{ "repositories":[ { "type":"composer", "url":"https://wpackagist.org" } ] }
Then, any theme and plugin can be imported to the project by using "wpackagist-theme" and "wpackagist-plugin" respectively as the vendor name, and the slug of the theme or plugin under the WordPress directory (such as "akismet" in https://wordpress.org/plugins/akismet/) as the package name. Because themes do not have a trunk version, then the theme’s version constraint is recommended to be “*”:
{ "require": { "wpackagist-plugin/akismet":"^4.1", "wpackagist-plugin/bbpress":">=2.5.12", "wpackagist-theme/twentynineteen":"*" } }
Packages available in WPackagist have been given the type “wordpress-plugin” or “wordpress-theme”. As a consequence, after running composer update, instead of installing the corresponding themes and plugins under the default folder vendor/, these will be installed where WordPress expects them: under folders wp-content/themes/ and wp-content/plugins/ respectively.
Possibilities And Limitations Of Using WordPress And Composer Together
So far, so good: Composer makes it a breeze to manage a PHP project’s dependencies. However, WordPress’ core hasn’t adopted it as its dependency management tool of choice, primarily because WordPress is a legacy application that was never designed to be used with Composer, and the community can’t agree if WordPress should be considered the site or a site’s dependency, and integrating these approaches requires hacks.
In this concern, WordPress is outperformed by newer frameworks which could incorporate Composer as part of their architecture. For instance, Laravel underwent a major rewriting in 2013 to establish Composer as an application-level package manager. As a consequence, WordPress’ core still does not include the composer.json file required to manage WordPress as a Composer dependency.
Knowing that WordPress can’t be natively managed through Composer, let’s explore the ways such support can be added, and what roadblocks we encounter in each case.
There are three basic ways in which WordPress and Composer can work together:
Manage dependencies when developing a theme or a plugin;
Manage themes and plugins on a site;
Manage the site completely (including its themes, plugins and WordPress’ core).
And there are two basic situations concerning who will have access to the software (a theme or plugin, or the site):
The developer can have absolute control of how the software will be updated, e.g. by managing the site for the client, or providing training on how to do it;
The developer doesn’t have absolute control of the admin user experience, e.g. by releasing themes or plugins through the WordPress directory, which will be used by an unknown party.
From the combination of these variables, we will have more or less freedom in how deep we can integrate WordPress and Composer together.
From a philosophical aspect concerning the objective and target group of each tool, while Composer empowers developers, WordPress focuses primarily on the needs of the end users first, and only then on the needs of the developers. This situation is not self-contradictory: For instance, a developer can create and launch the website using Composer, and then hand the site over to the end user who (from that moment on) will use the standard procedures for installing themes and plugins — bypassing Composer. However, then the site and its composer.json file fall out of sync, and the project can’t be managed reliably through Composer any longer: Manually deleting all plugins from the wp-content/plugins/ folder and executing composer update will not re-download those plugins added by the end user.
The alternative to keeping the project in sync would be to ask the user to install themes and plugins through Composer. However, this approach goes against WordPress’ philosophy: Asking the end user to execute a command such as composer install to install the dependencies from a theme or plugin adds friction, and WordPress can’t expect every user to be able to execute this task, as simple as it may be. So this approach can’t be the default; instead, it can be used only if we have absolute control of the user experience under wp-admin/, such as when building a site for our own client and providing training on how to update the site.
The default approach, which handles the case when the party using the software is unknown, is to release themes and plugins with all of their dependencies bundled in. This implies that the dependencies must also be uploaded to WordPress’ plugin and theme subversion repositories, defeating the purpose of Composer. Following this approach, developers are still able to use Composer for development, however, not for releasing the software.
This approach is not failsafe either: If two different plugins bundle different versions of a same library which are incompatible with each other, and these two plugins are installed on the same site, it could cause the site to malfunction. A solution to this issue is to modify the dependencies’ namespace to some custom namespace, which ensures that different versions of the same library, by having different namespaces, are treated as different libraries. This can be achieved through a custom script or through Mozart, a library which composes all dependencies as a package inside a WordPress plugin.
For managing the site completely, Composer must install WordPress under a subdirectory as to be able to install and update WordPress’ core without affecting other libraries, hence the setup must consider WordPress as a site’s dependency and not the site itself. (Composer doesn’t take a stance: This decision is for the practical purpose of being able to use the tool; from a theoretical perspective, we can still consider WordPress to be the site.) Because WordPress can be installed in a subdirectory, this doesn’t represent a technical issue. However, WordPress is by default installed on the root folder, and installing it in a subdirectory involves a conscious decision taken by the user.
To make it easier to completely manage WordPress with Composer, several projects have taken the stance of installing WordPress in a subfolder and providing an opinionated composer.json file with a setup that works well: core contributor John P. Bloch provides a mirror of WordPress’ core, and Roots provides a WordPress boilerplate called Bedrock. I will describe how to use each of these two projects in the sections below.
Managing The Whole WordPress Site Through John P. Bloch’s Mirror Of WordPress Core
I have followed Andrey “Rarst” Savchenko’s recipe for creating the whole site’s Composer package, which makes use of John P. Bloch’s mirror of WordPress’ core. Following, I will reproduce his method, adding some extra information and mentioning the gotchas I found along the way.
First, create a composer.json file with the following content in the root folder of your project:
{ "type": "project", "config": { "vendor-dir": "content/vendor" }, "extra": { "wordpress-install-dir": "wp" }, "require": { "johnpbloch/wordpress": ">=5.1" } }
Through this configuration, Composer will install WordPress 5.1 under folder "wp", and dependencies will be installed under folder "content/vendor". Then head to the project’s root folder in terminal and execute the following command for Composer to do its magic and install all dependencies, including WordPress:
composer install --prefer-dist
Let’s next add a couple of plugins and the theme, for which we must also add WPackagist as a repository, and let’s configure these to be installed under "content/plugins" and "content/themes" respectively. Because these are not the default locations expected by WordPress, we will later on need to tell WordPress where to find them through constant WP_CONTENT_DIR.
Note: WordPress’ core includes by default a few themes and plugins under folders "wp/wp-content/themes" and "wp/wp-content/plugins", however, these will not be accessed.
Add the following content to composer.json, in addition to the previous one:
{ "repositories": [ { "type": "composer", "url" : "https://wpackagist.org" } ], "require": { "wpackagist-plugin/wp-super-cache": "1.6.*", "wpackagist-plugin/bbpress": "2.5.*", "wpackagist-theme/twentynineteen": "*" }, "extra": { "installer-paths": { "content/plugins/{$name}/": ["type:wordpress-plugin"], "content/themes/{$name}/": ["type:wordpress-theme"] } } }
And then execute in terminal:
composer update --prefer-dist
Hallelujah! The theme and plugins have been installed! Since all dependencies are distributed across folders wp, content/vendors, content/plugins and content/themes, we can easily ignore these when committing our project under version control through Git. For this, create a .gitignore file with this content:
wp/ content/vendor/ content/themes/ content/plugins/
Note: We could also directly ignore folder content/, which will already ignore all media files under content/uploads/ and files generated by plugins, which most likely must not go under version control.
There are a few things left to do before we can access the site. First, duplicate the wp/wp-config-sample.php file into wp-config.php (and add a line with wp-config.php to the .gitignore file to avoid committing it, since this file contains environment information), and edit it with the usual information required by WordPress (database information and secret keys and salts). Then, add the following lines at the top of wp-config.php, which will load Composer’s autoloader and will set constant WP_CONTENT_DIR to folder content/:
// Load Composer’s autoloader require_once (__DIR__.'/content/vendor/autoload.php'); // Move the location of the content dir define('WP_CONTENT_DIR', dirname(__FILE__).'/content');
By default, WordPress sets constant WP_CONSTANT_URL with value get_option('siteurl').'/wp-content'. Because we have changed the content directory from the default "wp-content" to "content", we must also set the new value for WP_CONSTANT_URL. To do this, we can’t reference function get_option since it hasn’t been defined yet, so we must either hardcode the domain or, possibly better, we can retrieve it from $_SERVER like this:
$s = empty($_SERVER["HTTPS"]) ? '' : ($_SERVER["HTTPS"] == "on") ? "s" : ""; $sp = strtolower($_SERVER["SERVER_PROTOCOL"]); $protocol = substr($sp, 0, strpos($sp, "/")) . $s; $port = ($_SERVER["SERVER_PORT"] == "80") ? "" : (":".$_SERVER["SERVER_PORT"]); define('WP_CONTENT_URL', $protocol."://".$_SERVER[’SERVER_NAME'].$port.'/content');
We can now access the site on the browser under domain.com/wp/, and proceed to install WordPress. Once the installation is complete, we log into the Dashboard and activate the theme and plugins.
Finally, because WordPress was installed under subdirectory wp, the URL will contain path “/wp” when accessing the site. Let’s remove that (not for the admin side though, which by being accessed under /wp/wp-admin/ adds an extra level of security to the site).
The documentation proposes two methods to do this: with or without URL change. I followed both of them, and found the without URL change a bit unsatisfying because it requires specifying the domain in the .htaccess file, thus mixing application code and configuration information together. Hence, I’ll describe the method with URL change.
First, head to “General Settings” which you’ll find under domain.com/wp/wp-admin/options-general.php and remove the “/wp” bit from the “Site Address (URL)” value and save. After doing so, the site will be momentarily broken: browsing the homepage will list the contents of the directory, and browsing a blog post will return a 404. However, don’t panic, this will be fixed in the next step.
Next, we copy the index.php file to the root folder, and edit this new file, adding “wp/” to the path of the required file, like this:
/** Loads the WordPress Environment and Template */ require( dirname( __FILE__ ) . '/wp/wp-blog-header.php' );
We are done! We can now access our site in the browser under domain.com:

WordPress site successfully installed through Composer (Large preview)
Even though it has downloaded the whole WordPress core codebase and several libraries, our project itself involves only six files from which only five need to be committed to Git:
.gitignore
composer.json
composer.lock This file is generated automatically by Composer, containing the versions of all installed dependencies.
index.php This file is created manually.
.htaccess This file is automatically created by WordPress, so we could avoid committing it, however, we may soon customize it for the application, in which case it requires committing.
The remaining sixth file is wp-config.php which must not be committed since it contains environment information.
Not bad!
The process went pretty smoothly, however, it could be improved if the following issues are dealt better:
Some application code is not committed under version control. Since it contains environment information, the wp-config.php file must not be committed to Git, instead requiring to maintain a different version of this file for each environment. However, we also added a line of code to load Composer’s autoloader in this file, which will need to be replicated for all versions of this file across all environments.
The installation process is not fully automated. After installing the dependencies through Composer, we must still install WordPress through its standard procedure, log-in to the Dashboard and change the site URL to not contain “wp/”. Hence, the installation process is slightly fragmented, involving both a script and a human operator.
Let’s see next how Bedrock fares for the same task.
Managing The Whole WordPress Site Through Bedrock
Bedrock is a WordPress boilerplate with an improved folder structure, which looks like this:
├── composer.json ├── config │ ├── application.php │ └── environments │ ├── development.php │ ├── staging.php │ └── production.php ├── vendor └── web ├── app │ ├── mu-plugins │ ├── plugins │ ├── themes │ └── uploads ├── wp-config.php ├── index.php └── wp
The people behind Roots chose this folder structure in order to make WordPress embrace the Twelve Factor App, and they elaborate how this is accomplished through a series of blog posts. This folder structure can be considered an improvement over the standard WordPress one on the following accounts:
It adds support for Composer by moving WordPress’ core out of the root folder and into folder web/wp;
It enhances security, because the configuration files containing the database information are not stored within folder web, which is set as the web server’s document root (the security threat is that, if the web server goes down, there would be no protection to block access to the configuration files);
The folder wp-content has been renamed as “app”, which is a more standard name since it is used by other frameworks such as Symfony and Rails, and to better reflect the contents of this folder.
Bedrock also introduces different config files for different environments (development, staging, production), and it cleanly decouples the configuration information from code through library PHP dotenv, which loads environment variables from a .env file which looks like this:
DB_NAME=database_name DB_USER=database_user DB_PASSWORD=database_password # Optionally, you can use a data source name (DSN) # When using a DSN, you can remove the DB_NAME, DB_USER, DB_PASSWORD, and DB_HOST variables # DATABASE_URL=mysql://database_user:database_password@database_host:database_port/database_name # Optional variables # DB_HOST=localhost # DB_PREFIX=wp_ WP_ENV=development WP_HOME=http://example.com WP_SITEURL=${WP_HOME}/wp # Generate your keys here: https://roots.io/salts.html AUTH_KEY='generateme' SECURE_AUTH_KEY='generateme' LOGGED_IN_KEY='generateme' NONCE_KEY='generateme' AUTH_SALT='generateme' SECURE_AUTH_SALT='generateme' LOGGED_IN_SALT='generateme' NONCE_SALT='generateme'
Let’s proceed to install Bedrock, following their instructions. First create a project like this:
composer create-project "roots/bedrock"
This command will bootstrap the Bedrock project into a new folder “bedrock”, setting up the folder structure, installing all the initial dependencies, and creating an .env file in the root folder which must contain the site’s configuration. We must then edit the .env file to add the database configuration and secret keys and salts, as would normally be required in wp-config.php file, and also to indicate which is the environment (development, staging, production) and the site’s domain.
Next, we can already add themes and plugins. Bedrock comes with themes twentyten to twentynineteen shipped by default under folder web/wp/wp-content/themes, but when adding more themes through Composer these are installed under web/app/themes. This is not a problem, because WordPress can register more than one directory to store themes through function register_theme_directory.
Bedrock includes the WPackagist information in the composer.json file, so we can already install themes and plugins from this repository. To do so, simply step on the root folder of the project and execute the composer require command for each theme and plugin to install (this command already installs the dependency, so there is no need to execute composer update):
cd bedroot composer require "wpackagist-theme/zakra" composer require "wpackagist-plugin/akismet":"^4.1" composer require "wpackagist-plugin/bbpress":">=2.5.12"
The last step is to configure the web server, setting the document root to the full path for the web folder. After this is done, heading to domain.com in the browser we are happily greeted by WordPress installation screen. Once the installation is complete, we can access the WordPress admin under domain.com/wp/wp-admin and activate the installed theme and plugins, and the site is accessible under domain.com. Success!
Installing Bedrock was pretty smooth. In addition, Bedrock does a better job at not mixing the application code with environment information in the same file, so the issue concerning application code not being committed under version control that we got with the previous method doesn’t happen here.
Conclusion
With the launch of Gutenberg and the upcoming bumping up of PHP’s minimum required version, WordPress has entered an era of modernization which provides a wonderful opportunity to rethink how we build WordPress sites to make the most out of newer tools and technologies. Composer, Packagist, and WPackagist are such tools which can help us produce better WordPress code, with an emphasis on reusable components to produce modular applications which are easy to test and bugfix.
First released in 2012, Composer is not precisely what we would call “new��� software, however, it has not been incorporated to WordPress’ core due to a few incompatibilities between WordPress’ architecture and Composer’s requirements. This issue has been an ongoing source of frustration for many members of the WordPress development community, who assert that the integration of Composer into WordPress will enhance creating and releasing software for WordPress. Fortunately, we don’t need to wait until this issue is resolved since several actors took the matter into their own hands to provide a solution.
In this article, we reviewed two projects which provide an integration between WordPress and Composer: manually setting our composer.json file depending on John P. Bloch’s mirror of WordPress’ core, and Bedrock by Roots. We saw how these two alternatives, which offer a different amount of freedom to shape the project’s folder structure, and which are more or less smooth during the installation process, can succeed at fulfilling our requirement of completely managing a WordPress site, including the installation of the core, themes, and plugins.
If you have any experience using WordPress and Composer together, either through any of the described two projects or any other one, I would love to see your opinion in the comments below.
I would like to thank Andrey “Rarst” Savchenko, who reviewed this article and provided invaluable feedback.
Further Reading on SmashingMag:
Improving WordPress Code With Modern PHP
Caching Smartly In The Age Of Gutenberg
Implications Of Thinking In Blocks Instead Of Blobs
What Can Be Learned From The Gutenberg Accessibility Situation?

(rb, ra, il)
0 notes